Left Chest Embroidery Placement: Measurements, Chart and Logo Size
Exact left chest placement numbers for polos, tees, sweatshirts, jackets and youth sizes, a step-by-step marking method, a printable template and the digitizing settings that follow.

Embroidery Digitizing Studio
Commercial Digitizing Service
Need production-ready machine files? Explore our Left Chest Digitizing
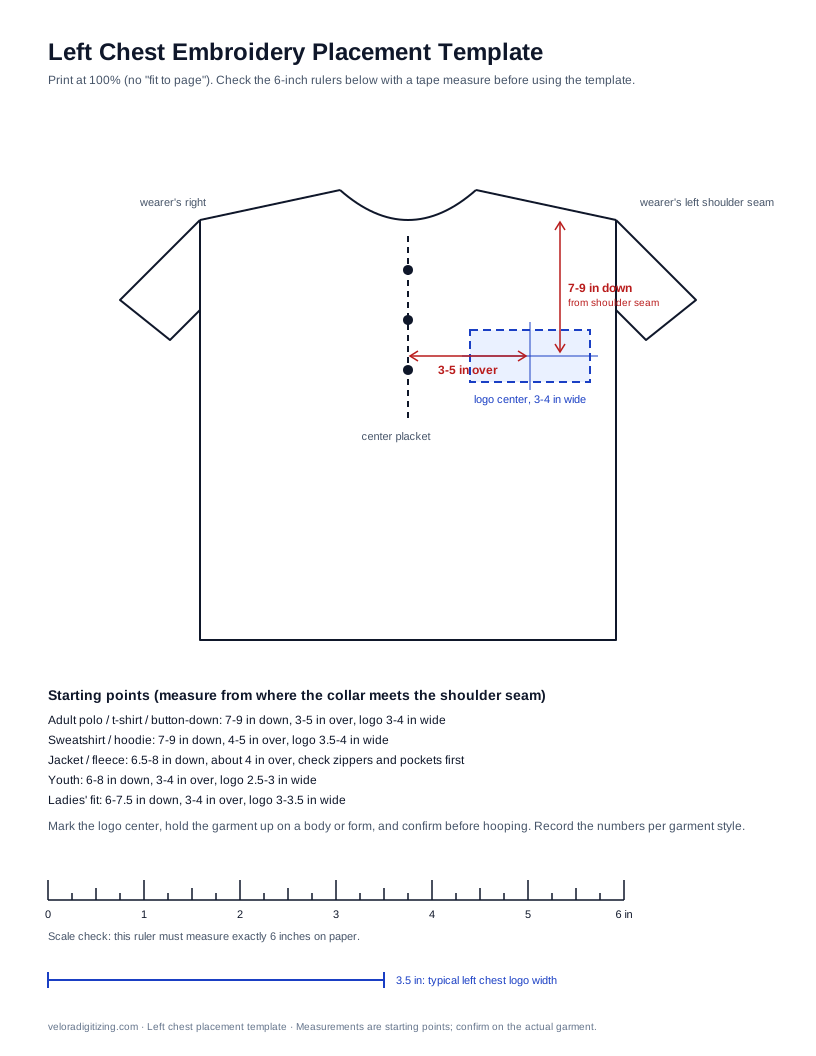
Standard left chest embroidery placement for an adult polo, t-shirt or button-down is 7 to 9 inches down from the point where the collar meets the left shoulder seam, and 3 to 5 inches over from the center of the placket toward the wearer's left, with the logo 3 to 4 inches wide. Youth shirts sit higher at 6 to 8 inches down. Jackets usually land 6.5 to 8 inches down and about 4 inches over, after checking for zippers and chest pockets.
Those numbers are starting points for an average adult medium. The rest of this guide gives you a placement chart by garment, a repeatable marking method, a printable template, the mistakes that make a correctly measured logo still look wrong, and the digitizing settings that follow from the placement. When your measurements are set, send the finished size and fabric to our logo digitizing team and the file is built for that exact spot. For sizes at other placements, see the embroidery logo size chart.
Left Chest Placement Chart by Garment
Measure down from where the collar seam meets the shoulder seam on the wearer's left, and over from the vertical center line of the garment (the placket on a polo or dress shirt). All figures are to the center of the logo.
| Garment | Down from shoulder seam | Over from center | Typical logo width |
|---|---|---|---|
| Polo shirt (adult) | 7-9 in | 3-5 in (about level with the second button) | 3-4 in |
| T-shirt (adult) | 7-9 in | 3.5-5 in (no placket, use the center fold) | 3-4 in |
| Button-down or dress shirt | 7-8.5 in | 3-4.5 in; center the logo on a chest pocket if there is one | 3-3.5 in |
| Sweatshirt or hoodie | 7-9 in | 4-5 in; move 0.5 in lower on heavy fleece | 3.5-4 in |
| Fleece or jacket | 6.5-8 in | about 4 in; clear zippers, storm flaps and pocket seams | 3-4 in |
| Youth sizes | 6-8 in | 3-4 in | 2.5-3 in |
| Ladies' fit | 6-7.5 in | 3-4 in (align just above the bust line) | 3-3.5 in |
| Adult 2XL to 4XL | 8.5-10 in | 4-5.5 in (shift outward with the wider chest) | 3.5-4 in |
How to Mark Left Chest Placement Step by Step
- 1Find the center line. Lay the garment flat without stretching it. On a polo or dress shirt the placket is the center. On a t-shirt or sweatshirt, fold it in half lightly to find the center and finger-press a short crease at chest height.
- 2Measure down. From the point where the collar seam meets the wearer's left shoulder seam, measure 7 to 9 inches straight down (use the chart above for other garments) and make a small mark.
- 3Measure over. From the center line, measure 3 to 5 inches toward the wearer's left at the height of your first mark. Where the two measurements meet is the logo center.
- 4Mark it. Use a water-soluble fabric pen, tailor's chalk or a small piece of low-tack tape. Many shops print the logo at finished size with crosshairs and tape the printout at the mark so the customer can see the actual size.
- 5Check against the collar and armpit. Hold the shirt up on a body or dress form. The logo should sit on the flat part of the chest, not up under the collar and not drifting toward the armhole. Adjust by up to half an inch and re-mark.
- 6Hoop to the mark. Align the hoop's center notches with your mark, hoop the fabric taut but not stretched, and run a sample. Record the final down and over numbers per garment style so the next order starts from the same spot.
Download the printable left chest placement template. It prints on US Letter at 100% scale and includes a 6-inch ruler for a scale check, the measurement callouts and the chart above. Open it in a browser and print, or import it into your design software.
Common Left Chest Placement Errors
- Too close to the armpit. Measuring over by 5 inches on a small or ladies' shirt pushes the logo into the sleeve seam area. Reduce the over measurement as the shirt gets narrower.
- Too high under the collar. Using a 7-inch drop on a tall or 2XL shirt leaves the logo looking like a collar badge. Larger sizes need 8.5 to 10 inches.
- Mirrored to the right chest. It happens when the garment is marked face down or when "left" is read from the viewer's side. Confirm the side on the wearer's body before hooping the first piece.
- One measurement for every size. A 3XL has several inches more chest width than a small. Scale the over measurement and, if the customer agrees, the logo width by about a quarter inch per two sizes.
- Ignoring pockets and seams. A logo that crosses a pocket edge, a zipper tape or a raglan seam will distort. Move it or change the finished size before digitizing.
- Measuring a stretched garment. Pulling a knit flat on the table adds length. Let it relax, then measure.
Left Chest Logo Size Standards
- Standard horizontal rectangle: 3.25 to 3.75 inches wide (height 1.25 to 1.75 inches).
- Square or circular crest: 2.5 to 3.0 inches across.
- Vertical or tall logos: maximum height about 3.0 inches to avoid dropping into the stomach area.
- Typical stitch count budget: 4,500 to 8,500 stitches for a standard corporate emblem. Estimate yours with the embroidery stitch count calculator.
If the emblem includes a tagline, URL or registered mark, check it against the micro-lettering embroidery guide before you fix the size. Lettering under about 4 mm tall is the most common reason a left chest logo has to be re-digitized larger.
Digitizing Settings That Follow From Placement
Once the placement and finished size are fixed, the stitch file is built for that size on that fabric. A file digitized at 3.5 inches for a pique polo is not the same file scaled to 2.75 inches for a youth tee: density, underlay and small lettering all have to be re-planned.
Pique cotton polo shirts
Pique has an open, textured waffle weave and stitches sink into the recesses if they are not supported. Use a double edge-run plus center-walk underlay under satin lettering, a 2.5 oz cutaway stabilizer, and a water-soluble topping to keep small text crisp. Standard size: 3.5 inches wide.
Performance and moisture-wicking polyester
Performance fabrics are light and elastic, so heavy density puckers them. Reduce top density by 10 to 15 percent (about 0.42 mm spacing), ease pull compensation, and pair the file with a soft no-show mesh cutaway. Standard size: 3.25 inches wide.
Fleece hoodies and softshell jackets
Fleece pile pokes through thin stitching. Use slightly bolder satin columns (1.5 mm or more), a heavy zigzag or edge-run underlay to compress the pile, and allow a 3.75-inch width so the logo reads from a distance. Check that the placement clears any chest zipper or pocket seam.
Woven button-down dress shirts
Stable wovens take a standard edge-run underlay and a crisp 2.0 oz tearaway. Keep the logo at 3.0 to 3.5 inches so it fits a pocket-width area, and confirm whether the customer wants it on or above the pocket.
Hooping Without Hoop Burn
Hoop burn is the shiny ring left when clamping pressure crushes luxury pique or mercerized cotton. Use magnetic hoops where you can, do not over-tighten manual hoop screws, and steam the garment lightly after unhooping. For hoop size by logo size, see the embroidery hoop sizes chart.
Order Left Chest Digitizing
Send the finished width, the garment and fabric, the machine format and your placement notes, and we build the file for that spot. Explore our embroidery digitizing services, order matching cap logo digitizing for branded headwear, or add raised lettering with 3D puff embroidery digitizing. Choosing blanks for a corporate order? See the best polo shirts for embroidery and the best fonts for embroidery.
Written by the Velora Digitizing Team
Digitizing StudioThis guide is written and reviewed by the digitizers at Velora Digitizing, who prepare embroidery files for caps, jackets, patches, and left chest logos every day. The advice here comes from the same stitch-path, underlay, and fabric choices we make on client orders.
Related service
Left Chest Digitizing