How to Digitize a Photo for Embroidery (Pet & Portrait Guide)
Digitizing a photo for embroidery is not a file conversion. Here is the six-step workflow, a size guide, which pictures stitch well and why one-click converters disappoint.

Embroidery Digitizing Studio
Commercial Digitizing Service
Need production-ready machine files? Explore our Custom Embroidery Digitizing
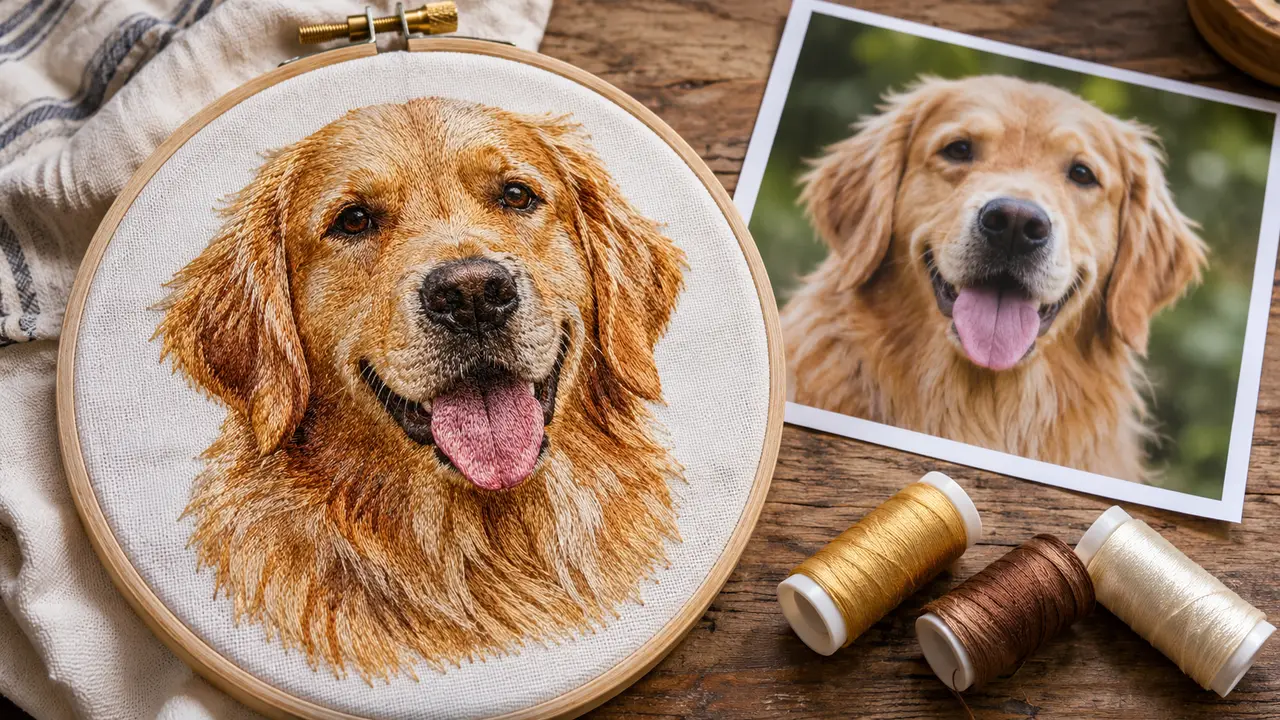
To digitize a photo for embroidery, you redraw the picture as stitch objects in embroidery software: fill areas for the main color zones, satin details and running-stitch highlights, each with its own angle, density and thread color. The result is a machine file such as DST or PES. There is no single button that turns pixels into good stitches, which is why the photo you choose and the way it is digitized matter more than the software.
This guide walks through how to digitize a picture for embroidery step by step, how to choose a photo that stitches well, what size to sew it at and where free photo to embroidery converters fall short. If you already have a photo ready, you can send it to our embroidery digitizing team for a quote, or check current digitizing prices first.
Why a Photo Is Harder to Embroider Than a Logo
A logo has flat shapes and solid colors, so each shape becomes one stitch object. A photo has thousands of tones that blend smoothly. Thread cannot blend like ink: each stitch is a solid color laid in a direction. The digitizer therefore has to simplify the photo into a small set of color zones and then use stitch direction and density to suggest shading, fur and depth.
- Color reduction: a photo with millions of colors becomes roughly 6 to 12 thread colors.
- Stitch direction: fur, hair and skin read naturally only when stitches follow the way they grow or curve.
- Density control: layered colors must stay light enough that the design does not turn stiff or pucker the fabric.
- Fabric pull: stitches pull the fabric as they sew, so shapes are compensated to stay in place. Our puckering and thread break guide explains why this matters.
How to Choose a Photo That Stitches Well
- 1Pick a sharp photo taken in good light. Blur cannot be repaired in stitches.
- 2Make sure the face or main subject fills most of the frame.
- 3Choose clear contrast between the subject and the background, for example a dark dog against a light wall.
- 4Avoid strong filters, heavy shadows across the face and backlit photos.
- 5Send the original file instead of a screenshot or a photo compressed by a messaging app.
- 6Tell the digitizer whether you want the background included or removed. Removing it usually gives a cleaner result.
Photo to Embroidery Converters vs Manual Photo Digitizing
Many people search for a photo to embroidery converter, an app that takes a JPG and returns a stitch file. These tools trace color areas automatically. They can be useful for a quick preview, but they make the same decisions everywhere and do not know how fabric behaves. Typical problems include:
- Too many stitches stacked in dark areas, which makes the design stiff and can break needles.
- Fill angles that ignore the direction of fur or hair, so the portrait looks flat.
- Tiny specks of color that create dozens of jumps and trims.
- No pull compensation, so outlines drift away from fills after sewing.
Manual digitizing fixes these by planning the design object by object. For a deeper comparison, read manual digitizing vs AI auto-digitizing. The same limits apply to simple image conversions, which we cover in how to convert PNG or JPG to a DST file.
How to Digitize a Picture for Embroidery: Step by Step
The same six steps apply in any digitizing program, whether you use Hatch, Wilcom, Embird or the free Ink/Stitch. Work from the back of the picture to the front and from dark tones to light.
- 1Prepare the picture and set the size: crop to the subject, remove or simplify the background and decide the sewn size first, because every later setting depends on it. Use the size guide below.
- 2Reduce the colors and plan the zones: group the photo into roughly 6 to 12 thread colors, from darkest to lightest, and outline where each tone sits. Posterizing the image in a photo editor first makes the zones easier to see.
- 3Trace the base fills and set stitch angles: digitize the largest, darkest zones first as fill objects, with the stitch direction following fur, hair or facial contours. Angle is what makes a stitched face look round instead of flat.
- 4Layer mid-tones and highlights lightly: add the lighter tones on top with a more open density than the base, so colors blend where they overlap and the design does not turn stiff.
- 5Add fine details last: small satin shapes for eyes and nose, and running stitches for whiskers, eyelashes and catchlights, sequenced at the end so they sit on top.
- 6Sequence, export and test: order the colors to limit trims and color changes, export to your machine format and stitch a test on the same fabric and stabilizer. Expect to adjust density and one or two colors after the first sew-out.
New to digitizing in general? The same building blocks are explained from the start in how to digitize a logo for embroidery. If the photo needs heavy cleanup before digitizing, a clean redraw can help. Our vector art conversion service can simplify a photo into clean artwork first, which is useful when you want a stylized portrait instead of a realistic one.
What Size Should a Photo Embroidery Be?
Size decides how much of the photo survives. Thread has a fixed thickness, so a face that is 6 inches tall can hold far more shading than the same face at 3 inches. Use this as a guide before you set the size in step 1:
| Sewn size | What it can show | Typical use |
|---|---|---|
| About 3 to 3.5 inches | A simplified, stylized face with few colors; eyes and nose as shapes, little shading | Left chest, cap side, small patches |
| About 4 to 5 inches | A recognizable pet or portrait with basic shading and fur direction | Hoodie front, tote bags, portrait patches |
| About 6 to 8 inches | Realistic shading, fur texture and clear eyes | Sweatshirt fronts, framed pieces, cushion covers |
| 10 inches and larger | The most detail, including background elements | Jacket backs and wall pieces |
Larger portraits are also heavier. A fully filled 5 x 5 inch portrait can run roughly 30,000 to 50,000 stitches, several times a typical logo, so it needs a stable fabric and a cutaway stabilizer.
Best Fabrics for Photo Embroidery
- Twill, canvas and denim: stable fabrics that hold detailed portraits well.
- Sweatshirts and hoodies: good for larger portraits with a cutaway stabilizer. See our hoodie embroidery guide.
- Patches: a portrait patch can be sewn or ironed onto almost anything. See custom patch digitizing.
- Thin T-shirts: possible, but keep the design lighter and use a cutaway backing.
- Size: around 4 to 5 inches or larger for a pet face keeps eyes and texture readable.
Detailed portraits use more stitches than a typical logo. To budget the job, try our embroidery stitch count calculator.
What to Send When You Order a Photo Digitizing Job
- The original, uncropped photo plus your preferred crop.
- Finished width or height in inches or millimeters.
- The garment or item and its fabric, for example a cotton twill cap or a fleece hoodie.
- Your machine format, such as DST, PES or JEF.
- Whether you want a realistic look or a simplified, stylized look.
Send these details through our contact page and we will confirm the size, color count and price before we start. You can see examples of stitched portraits and patches in our portfolio.
Budgeting a portrait order? See how much does embroidery cost. Fine fur and eye details often stitch best with finer thread; our embroidery thread weight guide explains when to use 60 wt.
Portraits look great on jacket backs and patches; see denim jacket embroidery and how to make embroidered patches.
Written by the Velora Digitizing Team
Digitizing StudioThis guide is written and reviewed by the digitizers at Velora Digitizing, who prepare embroidery files for caps, jackets, patches, and left chest logos every day. The advice here comes from the same stitch-path, underlay, and fabric choices we make on client orders.
Related service
Custom Embroidery Digitizing