Embroidery Hoop Sizes Chart: Which Machine Hoop to Use for Every Design
The right hoop keeps fabric tight and designs straight. Here is a machine embroidery hoop size chart, how to choose a hoop and why sewing field matters more than frame size.

Embroidery Digitizing Studio
Commercial Digitizing Service
Need production-ready machine files? Explore our Custom Embroidery Digitizing
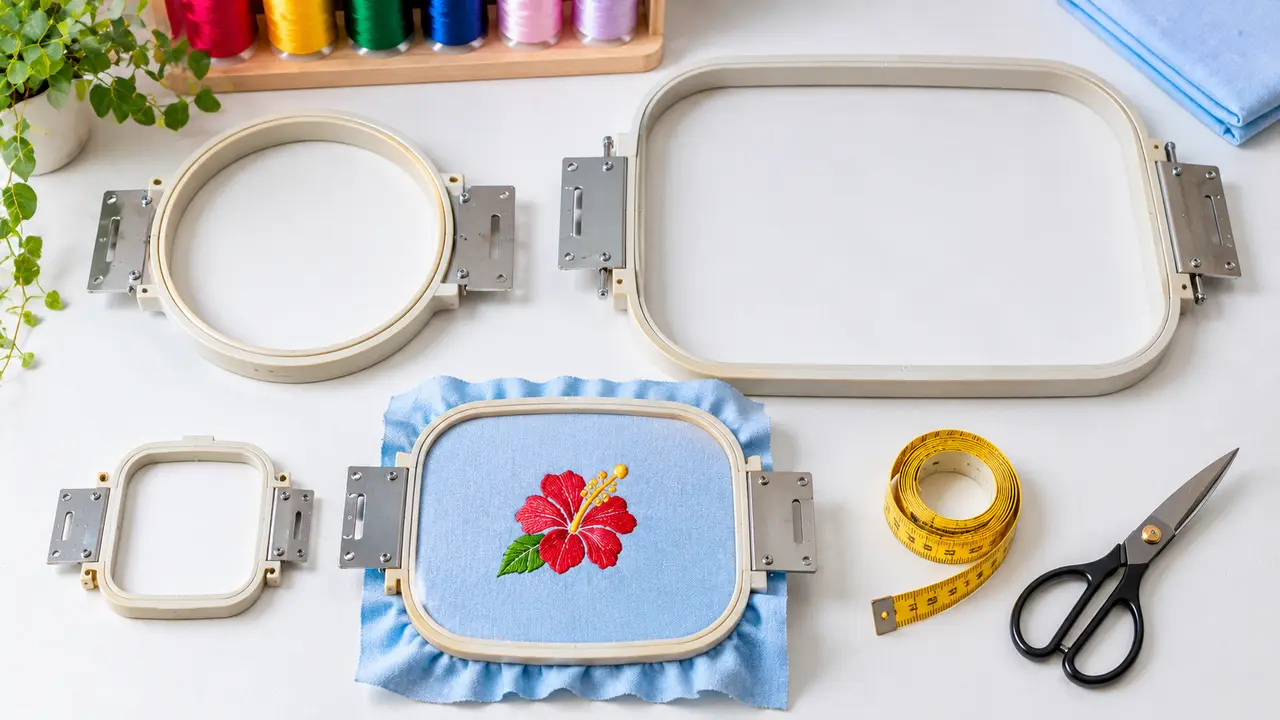
Embroidery hoop sizes decide how large a design you can stitch in one hooping and how firmly the fabric is held. The most common machine hoops are 4x4, 5x7, 6x10 and 8x12 inches, plus cap frames and round tubular hoops on multi-needle machines. The name is rounded: a 4x4 hoop has a sewing field of 100 x 100 mm, which is 3.94 inches, so a design that is exactly 4 inches wide will not fit. The rule is simple: use the smallest hoop whose sewing field fits your design with a small margin.
This guide includes a machine embroidery hoop size chart, explains sewing field versus frame size and shows which hoop suits each common placement. When you order a stitch file from our embroidery digitizing team, include your hoop or sewing field so the design is sized to fit.
Machine Embroidery Hoop Size Chart
| Hoop name | Sewing field (mm) | Sewing field (inches) | Typical uses |
|---|---|---|---|
| 4x4 | 100 x 100 | 3.94 x 3.94 | Small left chest logos, monograms, kids clothing, small patches. The only hoop on many entry-level single-needle machines. |
| 5x7 | 130 x 180 | 5.12 x 7.09 | Larger left chest logos, towel names, tote bags, pockets. |
| 6x10 | 160 x 260 | 6.30 x 10.24 | Full-front shirt designs, tall lettering, larger towel designs. |
| 8x8 | 200 x 200 | 7.87 x 7.87 | Square designs, quilt blocks, large patches. |
| 8x12 | 200 x 300 | 7.87 x 11.81 | Hoodie fronts, small jacket backs, big bag designs. |
| 9.5x14 | 240 x 360 | 9.45 x 14.17 | The largest field on top-end single-needle machines: jacket backs and large quilting designs. |
| Large commercial frames | Up to about 360 x 500 | Up to about 14 x 20 | Full jacket backs on commercial single-head machines. |
| Round tubular hoops | 120, 150, 180 and 210 diameter | About 4.7, 5.9, 7.1 and 8.3 diameter | Everyday garment work on multi-needle machines: left chest, sleeves, bags. |
| Cap frame | About 50 to 75 tall; width depends on the frame | About 2 to 3 tall | Front, and with a wide frame the sides, of structured caps. |
Sewing fields are standardized in millimeters and the inch names are approximations, which is why the inch column never lands on a round number. When you order or resize a design, work from the millimeter field of your own machine and leave a margin of a few millimeters inside it.
Hoop Size vs Sewing Field
The hoop frame is always bigger than the area the needle can reach. That reachable area is the sewing field. A design file must fit the sewing field, not just the hoop. If a design is too big, the machine will refuse it or hit the frame. Our DST vs PES vs JEF guide explains how machines read design size, and our guide on how to open a DST file shows how to check a design's dimensions.
Which Hoop for Which Placement
| Placement | Typical design size | Hoop to use |
|---|---|---|
| Left chest logo | 3.5 to 4 in wide | 4x4, or a 12 to 15 cm round tubular hoop |
| Cap front | Up to about 2.25 in tall | Cap frame; the file must be digitized for caps |
| Beanie cuff | About 2 in tall, 3 to 5 in wide | 4x4, a small round hoop or a clamp |
| Sleeve or pocket | 3 to 4 in wide | Small tubular hoop or clamp |
| Towel or tote bag name | 4 to 8 in wide | 5x7 or 6x10 |
| Hoodie or sweatshirt front | 10 to 12 in wide | 8x12 or larger |
| Jacket back | 10 to 12 in wide and tall | The largest frame your machine supports |
| Patches | 2 to 4 in | 4x4, or a larger hoop to stitch several at once |
- Left chest: 4x4 or a small tubular hoop for logos up to about 4 inches wide. See the left chest placement guide.
- Caps: a cap frame or cap hoop; files must be made for caps. See cap and hat logo digitizing.
- Beanies: a small hoop or beanie clamp on the unfolded cuff. See the beanie embroidery guide.
- Hoodies: 6x10 or larger for chest designs. See the hoodie embroidery guide.
- Jacket backs: the largest frame your machine supports. See the jacket back digitizing guide.
- Towels: 5x7 or 6x10 for names and monograms. See the towel and fleece guide.
How to Choose the Right Embroidery Hoop Size
- 1Measure the finished design width and height.
- 2Add a margin of roughly 0.5 inch (about 10 to 15 mm) on each side.
- 3Pick the smallest hoop whose sewing field fits that total.
- 4Check that the hoop fits the garment area, such as between seams and around pockets.
- 5Hoop the fabric firm and smooth, but do not stretch it.
Why Too Large a Hoop Causes Problems
A big hoop around a small design leaves a lot of loose fabric between the stitches and the frame. The fabric can bounce and shift, which causes outlines to miss their fills, puckering and thread breaks. Good stabilizer helps, but the right hoop matters more. Read our stabilizer guide and how to fix puckering and thread breaks.
When a Design Is Too Big for Your Hoop
- Resize carefully: small reductions of about 10 percent are usually fine, but large changes need re-digitizing.
- Split the design: add alignment marks and stitch it in two hoopings.
- Use applique: large areas can be covered with fabric instead of stitches. See applique digitizing.
- Make a patch: stitch it separately and attach it. See custom patch digitizing.
Tell us your machine, hoop and sewing field when you order and we will size the file to fit. See digitizing prices or send your artwork. Stitch count also changes with size; estimate it with the stitch count calculator.
Written by the Velora Digitizing Team
Digitizing StudioThis guide is written and reviewed by the digitizers at Velora Digitizing, who prepare embroidery files for caps, jackets, patches, and left chest logos every day. The advice here comes from the same stitch-path, underlay, and fabric choices we make on client orders.
Related service
Custom Embroidery Digitizing